
FL Studio ASIO vs ASIO4ALL
FL Studio can present several audio driver choices. FL Studio ASIO and ASIO4ALL are not the same driver. FL Studio ASIO is supplied with FL Studio and is often convenient when users need straightforward desktop audio behavior. ASIO4ALL is a separate universal ASIO driver that exposes compatible Windows WDM endpoints through its own control panel.
Neither option is automatically best for every computer. If a professional audio interface has a native ASIO driver from the manufacturer, that driver is usually the first choice. If the computer relies on built-in audio or a consumer USB device, compare FL Studio ASIO and ASIO4ALL for stable playback, recording input access, and acceptable latency.
Do not install ASIO4ALL merely because a tutorial says all FL Studio users need it. Install it when it solves a real routing or latency problem for the available Windows device. Keeping the driver choice intentional makes troubleshooting much easier.
| Driver | Good starting use | Consideration |
|---|---|---|
| Manufacturer ASIO | Dedicated audio interface | Usually provides the best hardware integration and direct monitoring. |
| ASIO4ALL v2 | Built-in or WDM-only Windows audio | Flexible endpoint selection; other apps may compete for the same device. |
| FL Studio ASIO | Simple FL Studio desktop playback | Convenient, but routing and latency behavior differ from ASIO4ALL. |
| Primary Sound Driver | Basic playback only | Higher latency and not the normal choice for live recording. |
Download and select ASIO4ALL in FL Studio
Close FL Studio before installing the driver. Download ASIO4ALL 2.22 through the verified official-source button, run the setup, and reopen FL Studio. The driver list is populated when the application starts, so leaving FL Studio open during installation can make the new entry appear missing.
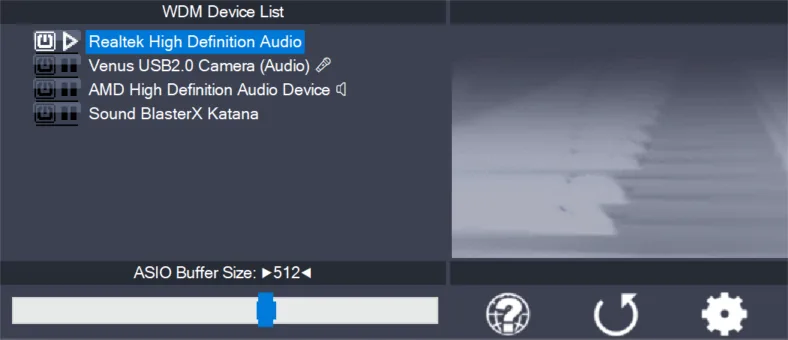
Open Options, choose Audio settings, and set the device to ASIO4ALL v2. Open the ASIO panel from the same settings page. In simple view, select the intended device. If the required microphone or output is hidden inside a device group, switch to advanced view and expand the WDM device tree.
- Install with FL Studio closed
Use the official ASIO4ALL 2.22 executable and complete setup.
- Open Audio settings
In FL Studio, use Options → Audio settings.
- Choose ASIO4ALL v2
Select it from the Device list rather than FL Studio ASIO.
- Open the ASIO panel
Enable the output and, when recording, the required input.
- Test the project
Play a simple project before reducing the buffer or enabling extra endpoints.
Set buffer size and recording latency
Buffer size is a tradeoff. A smaller buffer reduces the delay between playing or singing and hearing the result, but it gives the CPU less time to process instruments and effects. A larger buffer is more tolerant of heavy projects but adds monitoring delay. Start at 256 samples because it is a useful diagnostic middle ground, not because it is universally optimal.
For recording a MIDI keyboard or monitoring a microphone through plugins, try 128 or 64 samples only if playback stays clean. For mixing, 512 or 1024 samples can reduce overloads. Plugin delay compensation, look-ahead processors, linear-phase tools, and wireless headphones can add latency that the ASIO buffer alone cannot remove.
When recording vocals or instruments through a dedicated interface, use the interface's direct monitoring if available. Direct monitoring routes the input in hardware and can avoid the round trip through FL Studio. This is another reason a manufacturer driver may be preferable to ASIO4ALL for professional interfaces.
Fix FL Studio ASIO4ALL no sound
If FL Studio meters move but there is no sound, confirm that the correct ASIO4ALL output is enabled and that the FL Studio master is routed normally. A laptop may expose speakers, headphones, HDMI, and Bluetooth as separate outputs. Selecting an endpoint that is not connected can make the driver look functional while audio goes elsewhere.
If the output has a red status symbol, close browsers, Discord, media players, and any second audio host. Windows may allow another application to hold the endpoint in a format ASIO4ALL cannot currently open. Match the project sample rate to the device and temporarily increase the buffer.
When the microphone is missing, expand the input side of the device in advanced view and check Windows microphone privacy permissions for desktop applications. Avoid combining a Bluetooth headset microphone with a different playback clock during diagnosis. Test wired devices first.
- No sound: enable the physically connected output in the ASIO4ALL panel.
- Driver missing: close and reopen FL Studio after installation.
- Red endpoint: close other applications that may be using it.
- Crackles: raise the buffer and bypass heavy plugins while testing.
- Microphone absent: enable the correct input and check Windows permissions.
Test ASIO4ALL in FL Studio before changing more settings
If you are learning how to use ASIO4ALL in FL Studio, make the first test deliberately small: choose ASIO4ALL v2 in Options → Audio settings, enable one connected output in the control panel, and play a simple project. This confirms the driver path before you add a microphone, HDMI output, Bluetooth device, or several WDM endpoints.
Compare FL Studio ASIO and ASIO4ALL with the same project rather than changing the driver and buffer together. Keep the option that gives stable playback and the input access you actually need; a lower buffer is not automatically better when it creates clicks or drops.
FL Studio ASIO4ALL download checklist
Use this FL Studio ASIO4ALL download checklist to distinguish installation problems from mixer or recording configuration. After using the official installer, restart FL Studio, open Audio Settings, and select ASIO4ALL v2. Set a moderate buffer, open the panel, and enable only the output used by your headphones or speakers. Play an existing project before adding an input.
For recording, select the physical input in the ASIO4ALL panel, then choose its corresponding mono or stereo input on an FL Studio Mixer track. Arm that track and make a short recording. If meters move but no sound is heard, inspect mixer routing and monitoring before reinstalling the driver. If the endpoint is unavailable, close programs that may own it. Repeating the FL Studio ASIO4ALL download checklist after reopening the application confirms that device selection and project routing persist.
- Compare FL Studio ASIO and ASIO4ALL v2 with the same project and buffer.
- Use wired monitoring when evaluating latency.
- Keep the driver that provides stable playback, recording, acceptable delay, and consistent behavior after reopening FL Studio and system reboots.
FL Studio ASIO4ALL FAQ
Do I need ASIO4ALL for FL Studio?
Not always. Use a manufacturer's native ASIO driver when available. Compare ASIO4ALL and FL Studio ASIO when using built-in or WDM-only audio.
Is FL Studio ASIO the same as ASIO4ALL?
No. They are separate drivers with different control panels and routing behavior.
Where is ASIO4ALL in FL Studio?
Open Options → Audio settings and select ASIO4ALL v2 from the Device list after installation.
What buffer size should I use?
Start around 256 samples. Lower it for live input only while stable, or raise it for large projects and mixing.
Why is FL Studio silent after choosing ASIO4ALL?
The wrong output may be enabled or another application may hold the device. Open the panel, enable the connected output, and close competing audio apps.
How do I open the ASIO4ALL control panel in FL Studio?
Open Options → Audio settings, select ASIO4ALL v2 in the Device list, then use the ASIO control-panel button. Enable one connected output before adding other endpoints.
Get ASIO4ALL 2.22, then return to this guide for setup.
The official download opens after a 15-second source check.