
Open the ASIO4ALL control panel
The normal way to open the panel is from an ASIO-capable host. Select ASIO4ALL v2 as the audio driver, then choose the application's control panel, hardware setup, or ASIO panel button. The exact menu varies, but the panel belongs to the selected driver rather than to the Windows taskbar speaker menu.
You can also open Offline Settings without launching a host. This is useful for inspecting endpoints before a session, although the final device behavior still needs to be tested inside the DAW. Version 2.22 installs Offline Settings automatically.
If no panel opens, confirm that ASIO4ALL is installed and that the host is actually using ASIO4ALL v2. An application using WASAPI, DirectSound, Core Audio, or a native interface driver will open different controls.
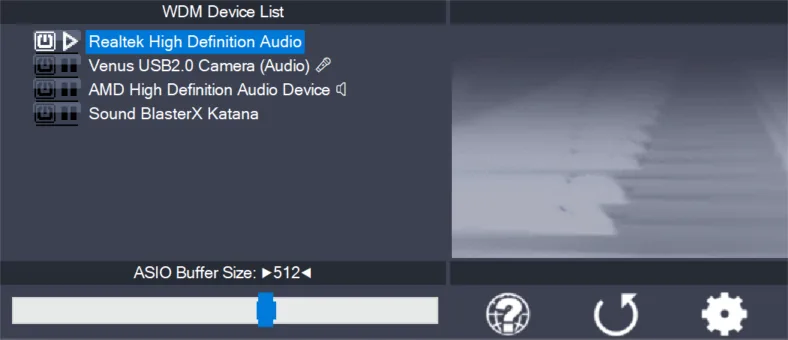
Enable inputs and outputs
The power control beside a device enables or disables it for ASIO4ALL. Devices may contain separate input and output endpoints, and advanced view can expand these branches. Enable the speakers or headphones you will monitor and the microphone or line input you will record. Leave HDMI, disconnected Bluetooth, and unused digital endpoints off while setting up.
A device that is available to ordinary Windows playback may still be unavailable to ASIO4ALL because another program is using it, the endpoint format conflicts, or the device is disabled. Close competing apps before assuming the driver is broken. A minimal one-input, one-output configuration is the most reliable diagnostic starting point.
Combining two unrelated devices can work, but they may use independent clocks. Over time, the streams can drift or require resampling. For critical recording, one audio interface handling both input and output is generally more predictable.
| Panel state | Meaning | What to do |
|---|---|---|
| Enabled endpoint | Selected for the ASIO path | Keep it on if it is the required input or output. |
| Inactive endpoint | Available but not selected | Leave it off unless the session needs it. |
| Unavailable or red status | Device cannot be opened | Close other apps, check Windows settings, and match formats. |
| Expanded device tree | Individual WDM endpoints are visible | Select the exact input or output instead of the entire group. |
| Multiple enabled devices | ASIO4ALL is aggregating endpoints | Watch for clock drift and simplify if playback is unstable. |
Choose an ASIO buffer size
The ASIO buffer determines how much audio the computer processes at once. Smaller buffers reduce round-trip latency but increase the risk of underruns. Larger buffers increase stability while adding delay. The correct setting depends on the device, CPU, sample rate, project complexity, and whether live monitoring is required.
Start at 256 samples. Record or play a simple session and listen for clicks. If stable, try 128 samples for live input. Move toward 64 only when the system remains clean. For mixing, raise the buffer to 512 or 1024 if heavy plugins cause overloads. A number that works in an empty project may fail after adding virtual instruments and look-ahead processing.
Latency also comes from conversion, USB transport, plugins, and wireless devices. A small ASIO buffer cannot make Bluetooth monitoring suitable for precise performance. Use a wired output or an interface's direct monitoring when low delay matters.
- 64–128 samples: possible tracking range on a stable, capable system.
- 256 samples: practical starting point for setup and general work.
- 512–1024 samples: useful for mixing or projects with high plugin load.
- Clicks or gaps: raise the buffer before enabling advanced workarounds.
- Noticeable delay: remove high-latency plugins and avoid Bluetooth before forcing a very small buffer.
Use advanced settings carefully
Advanced view exposes individual endpoints and options such as resampling and buffer synchronization. These controls exist for specific compatibility problems; they are not quality upgrades that should all be enabled. Change one option at a time and keep a note of the stable baseline.
The 2.22 release notes mention Alternative Buffer Synchronization for the Qualcomm Aqstic integrated microphone on Windows 11 ARM64. That is a targeted workaround, not a universal recommendation. Resampling can help when a device cannot open the requested sample rate, but matching the DAW and device rate directly is preferable when possible.
If changes make the system worse, return to a simple device selection and moderate buffer. The most useful control-panel skill is isolation: one host, one output, one input, one sample rate, and one change per test.
The official ASIO4ALL instruction manual is the primary reference for panel controls and device status.
A repeatable ASIO4ALL control-panel test
When you open the ASIO4ALL control panel, record the device names before changing anything. Start with one output and one required input, then play a representative project for a minute. This makes it easier to tell whether a red endpoint, sample-rate conflict, or buffer change caused the failure.
For a practical ASIO4ALL buffer-size example, begin at 256 samples, test playback, and move to 128 only when live input needs less delay and the system remains clean. Raise the buffer for a heavy mix instead of forcing advanced options to compensate for an overloaded project.
How to use ASIO4ALL session checklist
A practical way to learn how to use ASIO4ALL is to create a repeatable session checklist. Open the panel from the active DAW, switch to advanced view, and enable one output plus only the inputs required for the session. Confirm that the power icons are active and that no endpoint shows an unavailable symbol. Start at 256 samples with the DAW and Windows device set to compatible sample rates.
Play a demanding section of the project for at least a minute, then record a short take. Lower the buffer only when live-monitoring delay interferes with performance; raise it when mixing creates clicks. Make one change per test so the result has a clear cause. This how to use ASIO4ALL session checklist is more reliable than copying another computer's lowest buffer value because CPU load, device drivers, and USB behavior differ.
Save or note the stable configuration. If a later project fails, return to one output and one input before experimenting with resampling, hardware buffers, or multiple devices. The goal is not the smallest number in the panel; it is uninterrupted playback and recording at latency appropriate for the task.
- Recording: favor a smaller stable buffer and direct monitoring when available.
- Mixing: favor stability and increase the buffer for heavy plugin loads.
- Diagnosis: close competing audio programs and simplify endpoint selection.
How to use ASIO4ALL FAQ
How do I open ASIO4ALL?
Select ASIO4ALL v2 in an ASIO-capable host and open its driver control panel, or use the installed Offline Settings shortcut.
Why is my device unavailable?
Another application may own it, it may be disabled, or its audio format may conflict. Close competing apps and check Windows Sound settings.
What ASIO buffer size is best?
There is no universal best value. Start at 256 samples, lower it for live monitoring only while stable, and raise it for heavy projects.
Can ASIO4ALL use two audio devices together?
It can expose multiple WDM endpoints, but devices with independent clocks may drift or become unstable. One interface for input and output is more predictable.
Should I enable resampling?
Only when solving a sample-rate compatibility problem. Matching the project and device sample rates directly is usually the cleaner first approach.
What should I test first after changing ASIO4ALL settings?
Test one output with a simple project, then add the required input and record a short take. Change one endpoint, sample rate, or buffer setting at a time so the result has a clear cause.
Get ASIO4ALL 2.22, then return to this guide for setup.
The official download opens after a 15-second source check.